Jim-Jems
by Jim Gerrish

This is a "wing" of the Museum open to "practical science." It will contain practical tips for using science, technology, and innovation to solve household problems.

11/10/16 Cat Rangler


The concept behind the "Cat Rangler" is simple. If you have a cat that needs to be kept out of certain areas in your house and still insists on going exploring when your back is turned, the Cat Rangler keeps him or her out. It is just a decorative towel with some jingle bells sewed (or glued) on. On the corners (purple dots) are magnets or Velcro tabs so you can stretch the towel across a doorway, or hang up any place you want the cat to train the cat not to go. It doesn't harm the cat in any way, but makes sure you will hear when the cat starts messing with the barrier and the bells start jangling. That's when you go and shoo the cat away from the forbidden area by clapping your hands and making a fuss. It's easy for a human to enter and exit a room baricaded with your Cat Rangler, but the cat will always give itself away by making a noise.

I also get decorative jingle bells in the Dollar stores at Christmas time and hang several from door knobs so the cat can learn to ring them when it wants to go outside. The cat gets rewarded for ringing those doorbells by being petted and complimented for letting you know it wants to go out, as opposed to being scolded for ringing the Cat Rangler bells protecting forbidden areas.


08/26/16 Bee Brooms


One of my better and most practical "inventions" for this year consists of tying a knot in the center of a 2 foot strip of packing paper (the kind that is used as package stuffing to keep contents of mailed packages from shifting about). This then becomes what I call a "Bee Broom." You do NOT swat bees with it - you gently push them away from you and usually the bees get the "message" and go somewhere else. The East Orange Unified Marching Band found these most useful during their recent Band Camp in my backyard, where bees love to congregate among all the flowers. The campers soon learned not to fear or try to kill the bees, who were not interested in stinging them - they were just there for food. The "Brooms" are also good for driving away flies and mosquitoes as well.

You can see the construction of the "broom" better in this close-up of Anna Seck. Simple, cheap, but effective.


01/28/16 Ice Cream Bucket Birdfeeder

After Winter Storm Jonas passed through, I noticed a lot of hungry birds looking for food in the dried bushes surrounding my garden. In winter of 2014, I made a margarine tub bird feeder, but the number of birds overwhelmed it so that it barely lasted the winter. This time I decided to make a bigger and better version of it, using two one gallon (3.75L) ice cream buckets found in most supermarkets in the ice cream section. One bucket is used just for the large top, which I fastened to the bottom of the other bucket using hot glue. The birds can sit on the up-turned lid and if they pull seeds out of the feeder, most of them drop into the bottom lid where other birds can feed on them while waiting to get at the open hole.

Before gluing the lid on the bottom of the bird feeder bucket, I used a razor knife to cut four holes about an inch from the bottom of the bucket. The holes are large enough for most birds to be able to reach inside and help themselves to the contents. I cut four holes opposite one another in the sides of the bucket, but you could cut more holes if you want - there's room for more birds to feed at one time, but I don't like to start a gang war in my front yard. When the bucket is loaded with seed, the top is put on to keep out the rain and snow. The handle can be used to hang the bucket, but I preferred to also attach a rope to help steady the feeder and keep it from sliding around on the plastic handle.

Inside the bucket, I used hot glue to fasten a series of round lids from various other sources, margarine tubs, frosting containers, peanut butter jar caps, and so on. These keep the seeds from all falling out of the feeder too quickly. The birds have to reach in and remove them one by one as the pile of seeds gets smaller and smaller. By having the bird feeding holes an inch about the bottom, I can fill the bucket up with one inch of seed to get them started.

Feeding time at the Sanford Street Grapevine Bird Sanctuary.


05/01/15 - Making Dandelion Wine


04/18/15 Tomato Tower.

I have tried many different ways of tying up tomato plants to keep them from falling over and from dropping their tomatoes on the ground. This year, after pricing various devices for propping up tomato plants, I decided to come up with my own Tomato Tower. It is made from recycled stuff and once you get the concept, you can use a variety of different things and still come up with a nice inexpensive Tomato Tower of your own.

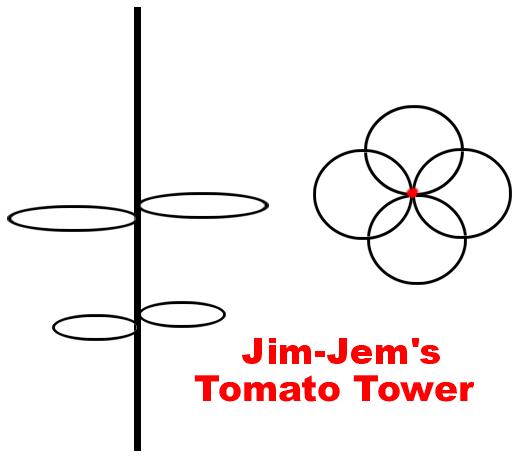
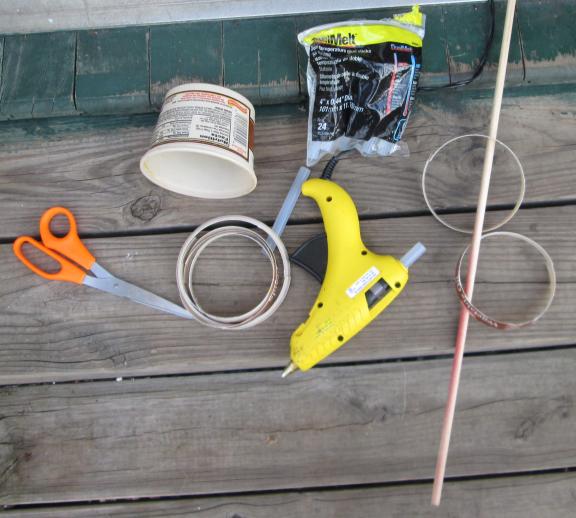
The basic tower is built around a stick.
It can be a straight tree branch, or a dowel,
or an old pipe... whatever you see lying
around that is not being used for anything
else.

It will be surrounded with rings. They can
be cut from plastic tubs, strapping tape,
or anything else you can see lying around
that is not being used and will probably
end up in the trash some day.

I am using a hot glue gun to attach the
rings to the stick, but you could use a
stapler, duct tape, or anything else you
don't need for some other purpose.


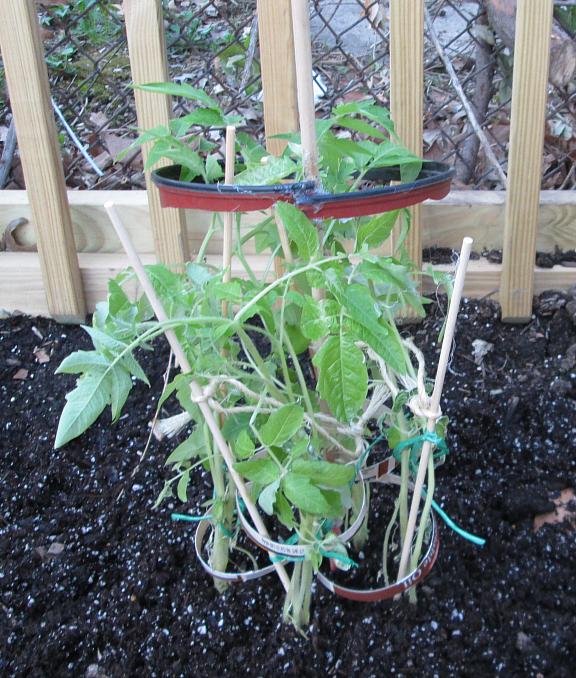
Just for fun, I am grouping four tomato plants
together around one tower, just to see if it can
be done. You might want to make your tower
for one, two or three plants instead of four.

The hot glue works, but takes a long time to
dry solid so that it holds the rings straight out
from the stick.


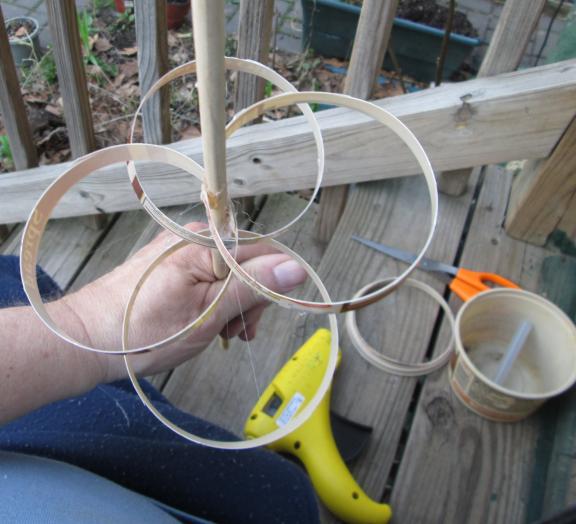
I will continue to add larger rings to the top of
the stick as the tomato plants continue to grow.
Fortunately, I have some old plastic planter
pots in the recycle bin, and they can provide me
with the larger rings I need to keep adding.

This only works because I have a source of
electricity near my garden, so I can plug in
the hot glue gun to add new rings at any time.
Otherwise, I would have to find a new way to
fasten the rings to the top of the stick, like
twist-ties, or twine soaked in glue, and so on.

Note that I left the original Barbecue skewers
on the tomato plants that they grew up with
as seedlings this past March. When the plants
are well rooted, I will slide those out and clip
off the twine ties and use them again next year.

04/23/15 - The weather got very cold last night, threatening to drop below 32 degrees (freezing), so I found one more use for my Tomato Tower when combined with a white or clear plastic kitchen garbage bag. I tied a string around the top of the wooden dowel that is the center of my Tomato Tower. This allowed me to cut a small hole in a plastic margerine tub or ice cream tub lid and fit it on top of the pole so it wouldn't slide down past the string knots. Then, over the whole thing, I inverted the white plastic garbage bag which covers the tomato plants and holds in some heat. The bottom of the bag can be stuck to the ground around the base of the tomato plants using barbecue skewers or small rocks or pebbles. I am going to leave the bag on top of the plants all day since the weather is predicted to be just as cold for a few more nights. The plants get plenty of light through the white bag, and would get even more through a clear bag. As soon as it is safe, I will remove the bag and the top plastic lid and let the tomatos keep on growing.


04/08/15 Pet Tray for Seniors. As I get older, it is more difficult for me to bend over, all the way down to the floor to feed my little carnivores (cats - but this works for dogs as well). I'd prefer not to invite them to jump up onto my table for feeding, although it would be easier for me. Fortunately my solution to lowering pet dishes down to the floor and picking them back up again was quite simple:


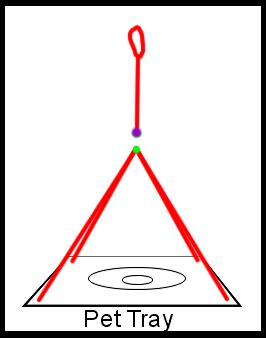
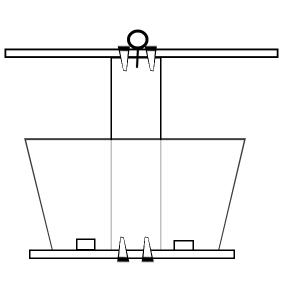
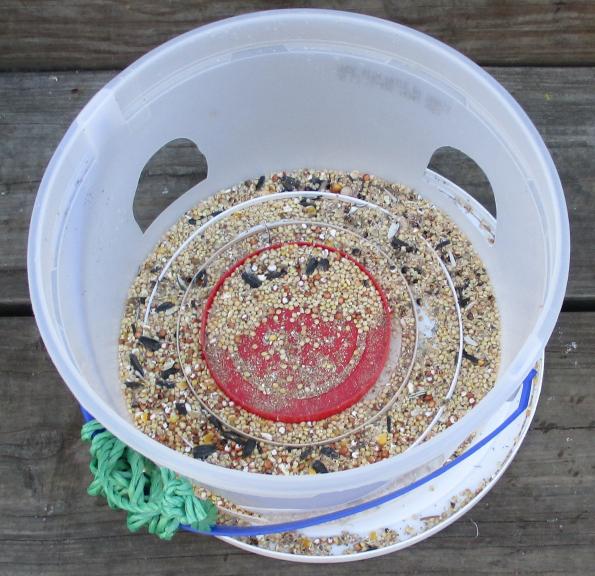
The pet dishes are placed on a small tray. I found some nice plastic ones at the local Dollar Store, but they could also be made of thin plywood and painted to make them easy to clean. Four holes are drilled in the four corners of the tray. Then four ropes (strings or shoelaces, etc.) are threaded through the four holes and meet together at a point well above the tray. How high is determined on how far down you can reach to raise and lower the tray. The central point of the four ropes is tied to a steel washer (shown in green). The steel washer is easily attracted to a strong magnet (the purple dot) tied or taped to another piece of rope or string. You only use this to get hold of the central point of four ropes and then detach the magnet. DO NOT try to lift the tray with the magnet. The other end of the magnet rope has a loop for hanging.

Here's how it works in feeding. Prepare the pet dishes on your table at a convenient height for you. Place the pet dish onto the center of the tray. Grab the ropes at the center point and lower the tray to the floor. Move the center point (steel washer) of the ropes to one side and let it drop to the floor. The hungry animals will soon get used to this and learn to ignore the rope when it drops. When they are finished, get your magnet rope, lower the magnet end to the floor and use it to lift up the steel washer at the center point of the four ropes so you can grab them with your hand. Detach the magnet and lift the tray back up - no bending over required. Remove the pet dish for washing, and wipe down the tray as needed for sloppy eaters. Wind the ropes around the tray and put in a dish rack for next feeding time.

02/06/15 I'm still on the topic of cold feet in winter, as the temperature drops tonight into the teens. I like to wear fleece pants around the house this time of year to keep warm in the winter, and frequently wear them right to bed as pajamas. Sound familiar? During the night, the bottoms of the pants used to ride up my legs and that gave me cold ankles and feet. My solution was simple. Velcro ®.

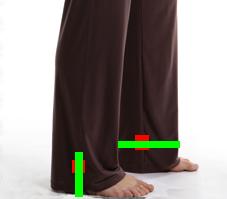
I call these Foot Fits. The small red square is a bit of "Hooky" Velcro, and the green rectangles are straps of wooly or fuzzy Velcro. I use the Velcro that sews on - no adhesives involved. You can get these from any sewing or fabric store or department. Sew a "Hooky" tab (red) on each side of the pant leg down close to the ankle. Take the fuzzy Velcro strap (green) and wear it either around your leg at the ankle (right) or down, under your foot, and up the other side (left). When going outdoors, I like to have the bottoms of my fleece pants down inside my boots, and the Velcro strap holds the bottom of the pants tight against my legs while in the boots. At night, I like to use the strap under my foot to keep the pants from riding up on my legs. Also, when I wear loose bed socks the straps keep my ankles and legs warm all night. Problem solved.


06/09/14 Non-Electric "Hot Spot" Sheet/Blanket. Necessity is the Mother of Invention. I needed a non-electric blanket to keep my cold feet warm during the winter, and now that the summer is upon us, I still need warm feet, but under a sheet and not a blanket. My solution was simple.

It takes three blankets for the winter version, and two sheets and a blanket for the summer version.

The top two sheets/ blankets are sewn together across the bottom edges. The third blanket (even in summer it is a light weight blanket, not a sheet) is "Z" folded beneath the top two sheet/blankets. The bottom edges are also sewn to the bottom edges of the two upper sheet/blankets.

You have the option of sewing the side edges of the "Z" folded blanket to the edges of the sheet or blanket just above it (not the top sheet or blanket).

Starting with the coldest part of winter, the Hot Spot Blankets are worn as a bed cover as shown in the above diagram. You are snug beneath two warm blankets, and there are two "pockets" in the "Z" folded blanket in which to put your cold feet. The top pocket, named the "Cool Spot" is where you put your feet if your feet feel comfortable. If you need more warmth, you tuck your feet into the lower pocket named the "Hot Spot" where you have the equivalent of two more blankets surrounding your feet.

As Spring approaches and the winter is not as cold, you can take the top blanket and fold it down around so that you are resting on top of it, and only need one blanket (plus the "Z" pockets for your feet).

When even one blanket feels too warm as a top cover, use the version made with two top sheets and a "Z" pocket blanket. As summer gets warmer, you can fold the top sheet down around and lie on top of it with only the cover of one sheet (and the "Z" pocket if your feet still feel cold).

05/05/14 - Sunny Window Solar Heater

In 2012 I came up with an idea for a solar room heater that could be mounted over a windowsill like an air conditioner, but which would heat a room instead of cool it, using only the free energy from the sun. This year I submitted my idea to Quirky and if it passes their approval, it might actually get built and be available in stores.

https://www.quirky.com/invent/1117730/action/vote/query/view=trending&categories=electronics If you visit this page and think my idea has merit, please click on the "thumbs up" button and vote for it. Now that I've seen for myself how well the Sun Rocket (below) works, I am convinced that my Sunny Window Heater would cut down my heating bill next winter.

4/25/14 - Sun Rocket Review -

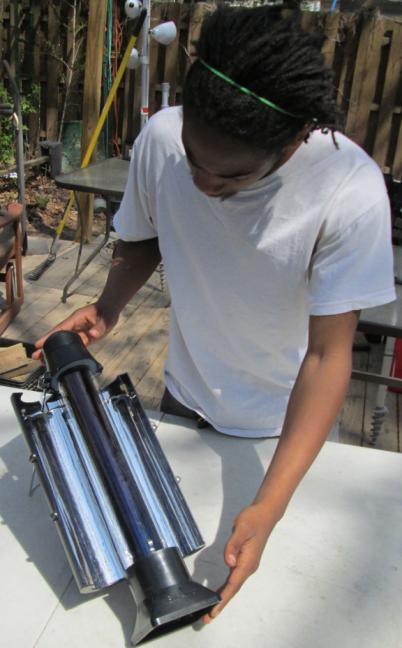
The Sun Rocket (a.k.a. Hot Water Rocket) , from Solutions From Science, is a solar water heater and thermos all in one. I was intrigued by it because it claimed to not just heat water, but to bring it to a boil. If it can do that, I reasoned, then it could "pasteurize" water from my rain barrels or a clear running stream and make it safe for drinking in an emergency. It makes no claims to filter water, but there are other products that do that job. Once the water has been filtered, it still needs to be boiled to rid it of every last living pathogen. This product does just that.

I bought one ($40) to test it, and filled it with a bottle of spring water - already safe to drink. It held just one bottle, but that is enough to pour two cups of tea, coffee, instant soup, hot chocolate, or two bowl servings of instant cereal or Raman noodles.

It took a couple of hours of sitting in direct sunlight to bring the water to a boil, but when I opened up the thermos (carefully!) the water inside was really boiling. The steam pressure is regulated by a valve at the top of the thermos so it won't explode. It was easy to face the Sunrocket directly into the sun simply by aligning it with its own shadow. It doesn't need to be constantly turned to face the sun because the side reflectors grab sunlight from any angle and direct it at the double-walled glass thermos inside.

This is well worth adding to your emergency kit, or just take it along on picnics or camping trips.


Margarine Tub Bird Feeder

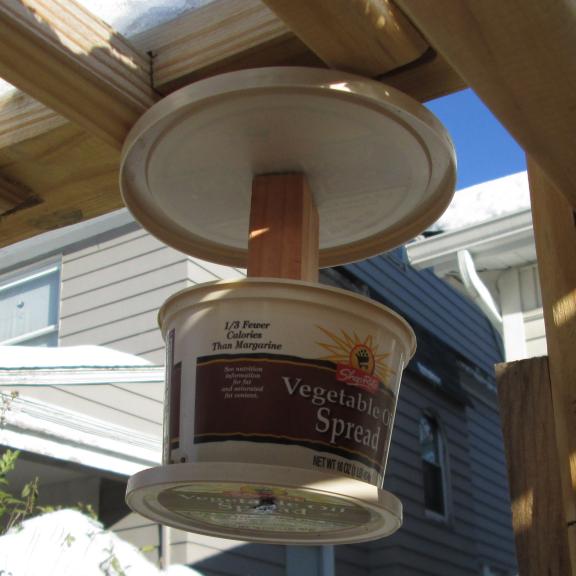
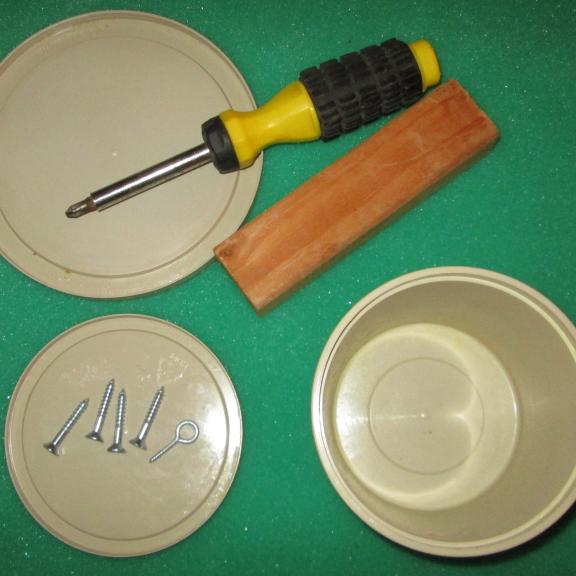
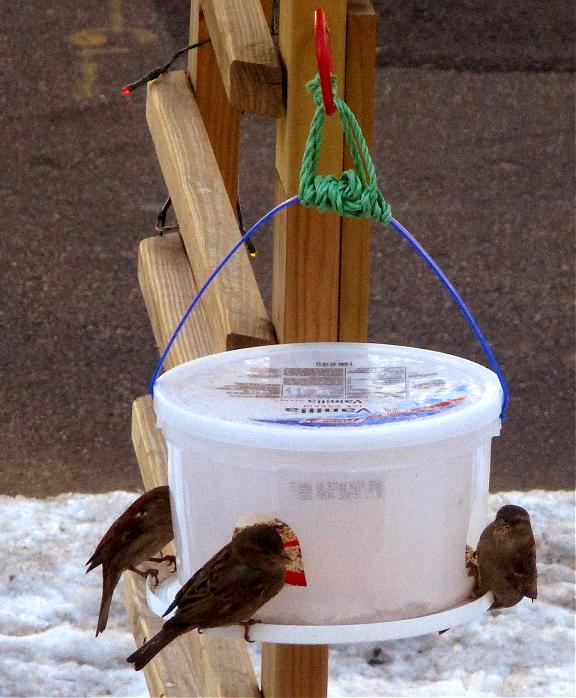
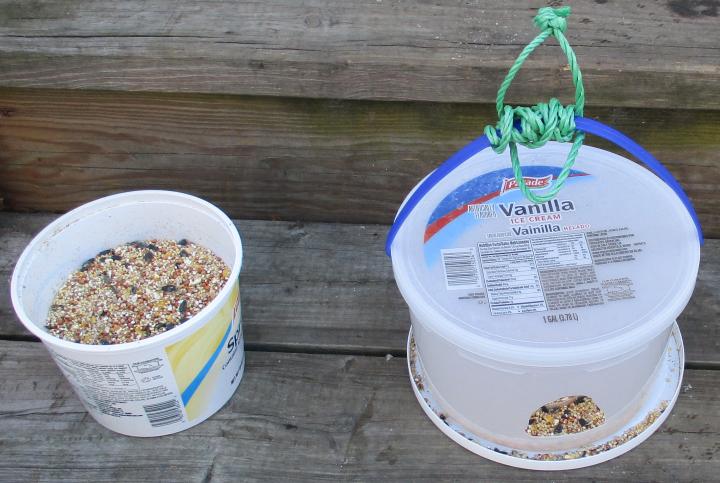
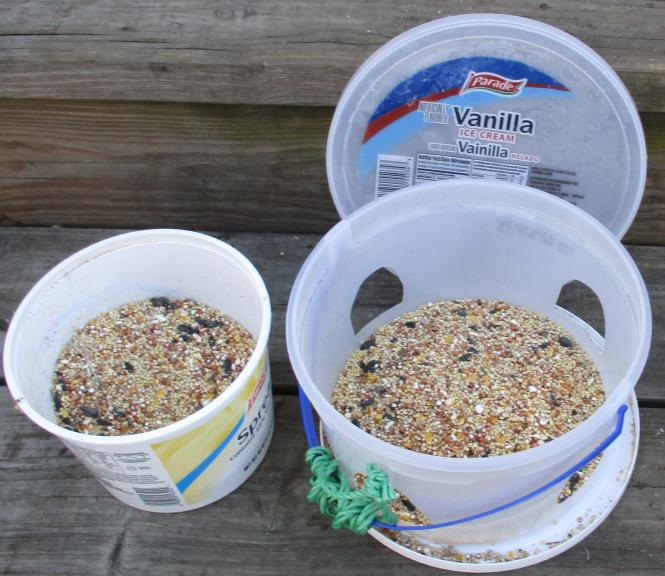
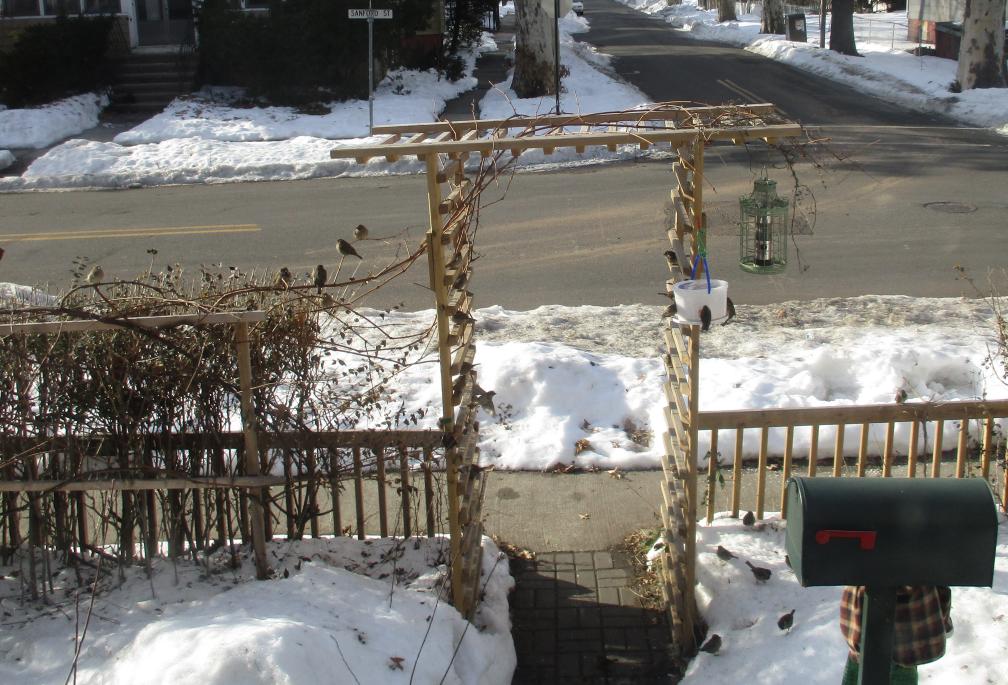
One of my ways of combating "cabin fever" during the ice and snow storms this winter, has been to work on projects designed to get me outdoors and back into my frozen garden. After looking on-line for some outdoor wild bird feeders and getting price shock, I dug around in my junk pile and came up with the "Margarine Tub Bird Feeder" which cost me about a half-hour of work.

Starts with an idea.... Collect all the pieces needed ....

I found a top from a large tub of margarine, and a complete top and tub from a smaller size container. I rounded up a piece of wood that was taller than the small tub, so birds could stand on the edge and dip down into it. But I also cut several small openings in the bottom of the tub that would allow seeds to dribble out of the tub and onto the smaller container top which is screwed into the bottom end of the wood. The large container top is screwed onto the top end of the wood, along with a screw eye used for hanging the bird feeder. Fill the small tub with bird seed (some dribbles out onto the bottom "tray") and hang it up where the birds can find it. Then you can sit inside where it's warm and watch the birds who don't fly south for the winter enjoy a feast from your winter garden.


Candle Heater / Low Watt Electric Heater

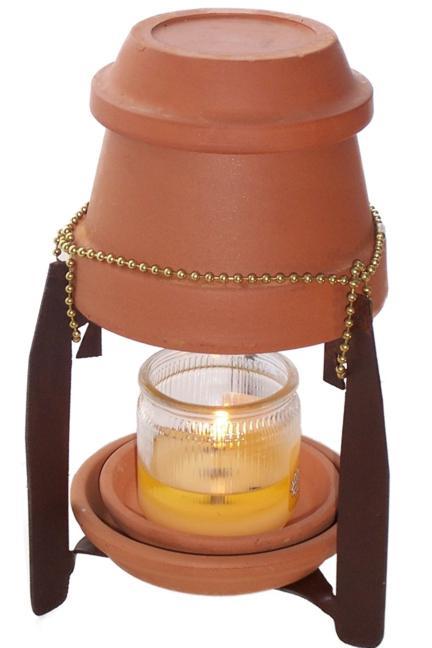
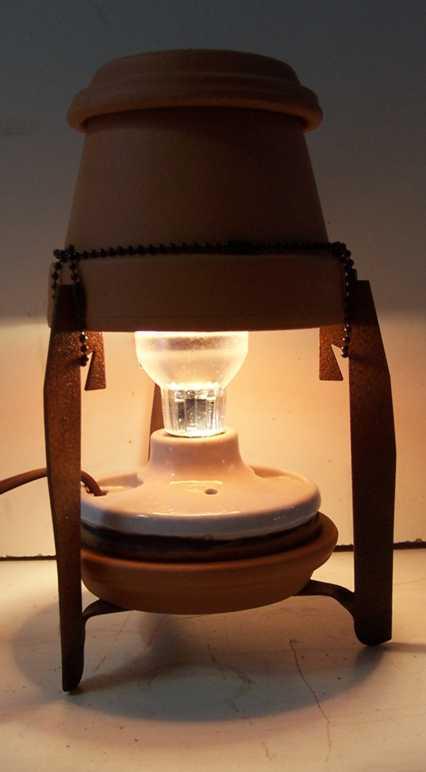
This is not my original idea, but it is a great home project that can provide additional heat at low cost, helping to reduce your electric bill if you use electricity to supplement your home heating.

The One-candle Flower-pot Furnace is described HERE.

The 60 watt Halogen Bulb Flower-pot Furnace is described HERE. Keep in mind that most electric heaters that you buy from stores use 500 to 1,000 watts or more.

You can buy either of the above ready-made OR you can learn how to make one yourself from the same Web site.

Available from Amazon.com as of 1/17/14 - http://www.amazon.com/Biedermann-Sons-H-350-Scandinavian-Christmas/dp/B000VUX5VK/ref=pd_sim_hg_2

This is my contribution to both of the above furnaces. After using as a Christmas decoration, remove the candles and disconnect the bell ringers and set this on top of your candle or electric bulb furnace. The heat from the furnace makes the propeller go around and this circulates the warm air rising from the furnace to help spread it around your room without using any electricity. You don't have to buy one- it is easily made from heavy-duty aluminum foil or aluminum sheeting. Cut a circle from the foil and find the center point at which it will balance and spin. Then cut the circle into fan blades and angle the blades down towards the heat source. The whole trick is to get the fan balanced so that it will spin on the point of a nail (file down the point of the nail so it is smooth). The nail can be held upright by a base made of aluminum foil wrapped around a stone, and then it will sit on top of your furnace (or make more for your radiators) moving the heated air around your room for free.


January 6th, 2014 - Hanging Cheap Calendars - Floppy Calendar Solution

The problem with cheap Dollar Store calendars is that they are printed on flimsy paper that begins to flop and curl. My past solutions were to simply tape the top corners to the wall, which works nicely on wooden porch walls, but tears off paint from interior wallboard walls.

This year, 2014, I tried something different. In the past I had been throwing away the cardboard that is usually found inside the cheap calendars, so you don't realize how cheap and floppy they are until you open them. That cardboard plus a couple of plastic clothes pins are my simple solution to floppy calendar pages.

The cardboard is placed behind the top of the calendar. A pushpin is used to fasten the calendar to the wall. The two clothes pins attach the edges of the calendar to the cardboard. Problem solved, and I'll never throw away the cardboard inserts again until the next calendar needs to be displayed.

This may seem stupidly simple, but these stupidly simple solutions add up to making life a little easier.


September 23, 2013 - Aluminum Caldero All-Year Barbecue

After wearing out cheap Barbecue Grills year after year from rust, heat damage and just plain falling apart, I decided to invest some time and a little money in coming up with a Barbecue Grill that could be used all year 'round and which would last for five or ten years without rust or damage.


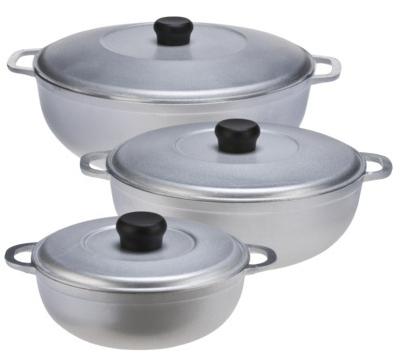
In the local Dollar Stores I found cast aluminum Calderos and immediately knew they would last a long time converted to barbecue grills. What's a Caldero? It's Spanish for "Cauldron" but it's better explained in photos like the one at the left. They come in different sizes, and are often sold as a set of three, but I only needed two for my purposes; a medium (13") and a small (12"). You may wish to get the large and the medium if you need more cooking space.


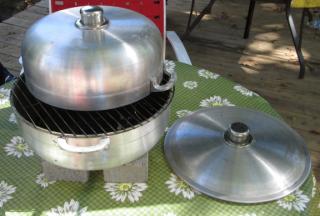
The largest Caldero is used to hold the charcoal. Save the lid and you can save money on charcoal by covering the Caldero to immediately extinguish the coals and use them a second or third time. The smaller Caldero is inverted and becomes the lid for your barbecue. I drilled a hole in the center of the smaller Caldero and screwed the lifting handle from the top into that hole so that I could easily lift off the top of my barbecue. A plastic handle might melt from the heat, but the handles on mine were solid metal. The Bar-B-Q sits on two bricks, keeping the heat well away from the tabletop.


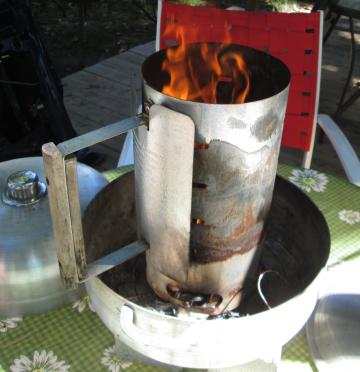
I am cooking for one today, so I only need about 10 charcoal briquettes. I get the plain charcoal that has not been soaked in firestarter because I don't like the petroleum fumes either in the smoke or in my food. To start the charcoal, I use a small charcoal chimney available in most hardware stores or on-line. Crumpled balls of newspaper from left-over advertisements is all it needs to start the charcoal glowing within five minutes.


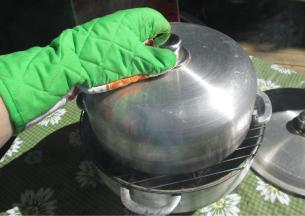
The small calderon used as a cover can get very hot during cooking, so use an oven mitt to lift it on and off the grill. I keep the 13 inch top of the larger calderon on the side to act as a heat resistant surface so I can put the hot top down on something to cool while I check on the food.

I kept a 13" stainless steel grill that came with one of my rusted out barbecue cookers, but you can buy them separately on-line if you don't have one sitting around in your basement or garage.


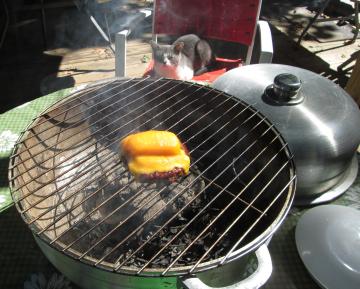
I like the chunks of real cheese rather than the cheese food slices, so the lid helps to melt cheese on top of my hamburger. The cat is hoping I have cooked enough to spare him some meat with cheese. You can see it only took a few coals to cook for one person, but there is plenty of room to fill the bottom calderon to feed a lot of hungry people or cats.

I call this an All-Year Bar-B-Q because it takes up so little space and I can use it on my open porch or deck to cook even in the dead of winter (never cook inside a closed space because of the carbon monoxide fumes!). When I have finished cooking, I put the 13 inch lid back on the 13 inch bottom calderon and it quickly extinguishes the coals from lack of oxygen. Later, when the coals have cooled, I can pluck them out of the ashes with tongs and use them over again the next time I want to Bar-B-Q. Maybe I'll add a few fresh coals, but waste not, want not.
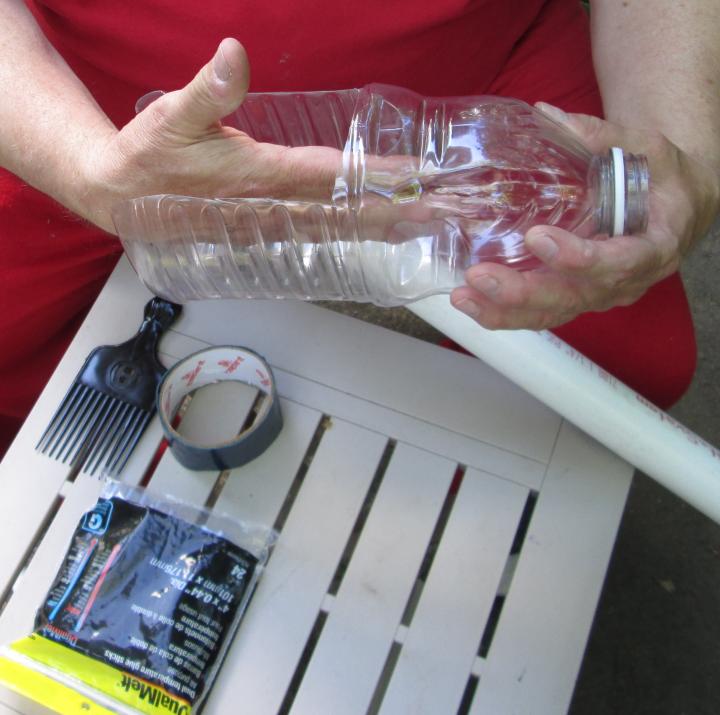
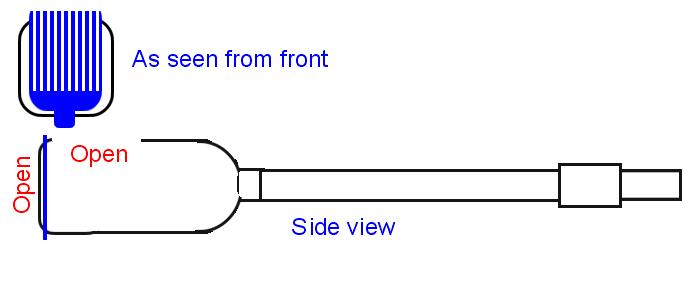
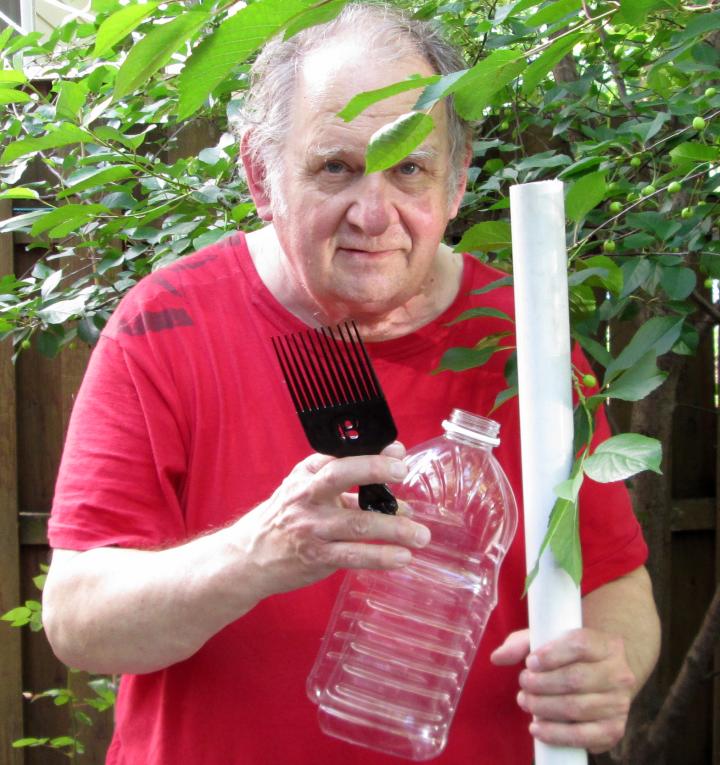
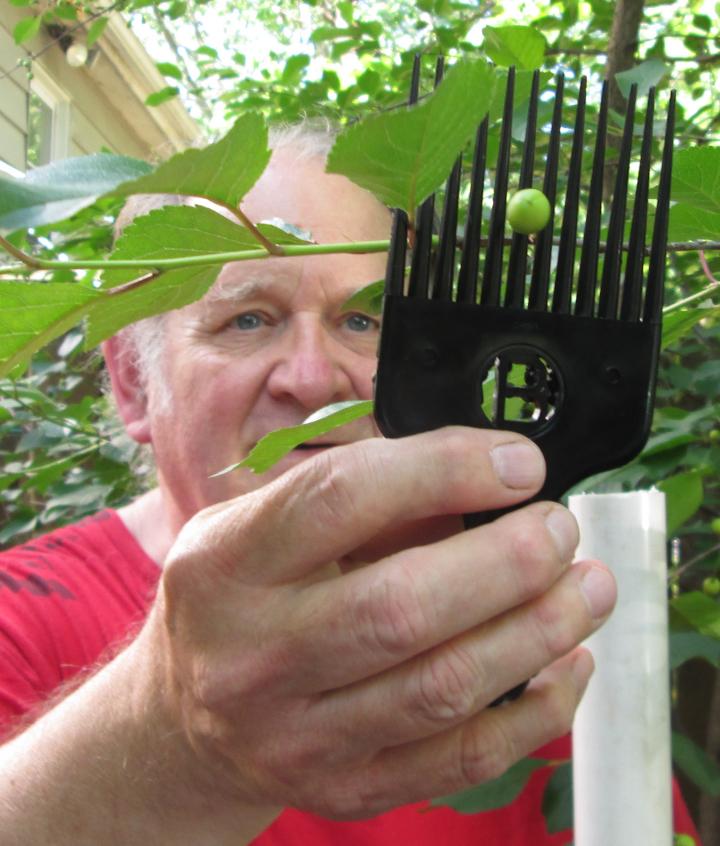
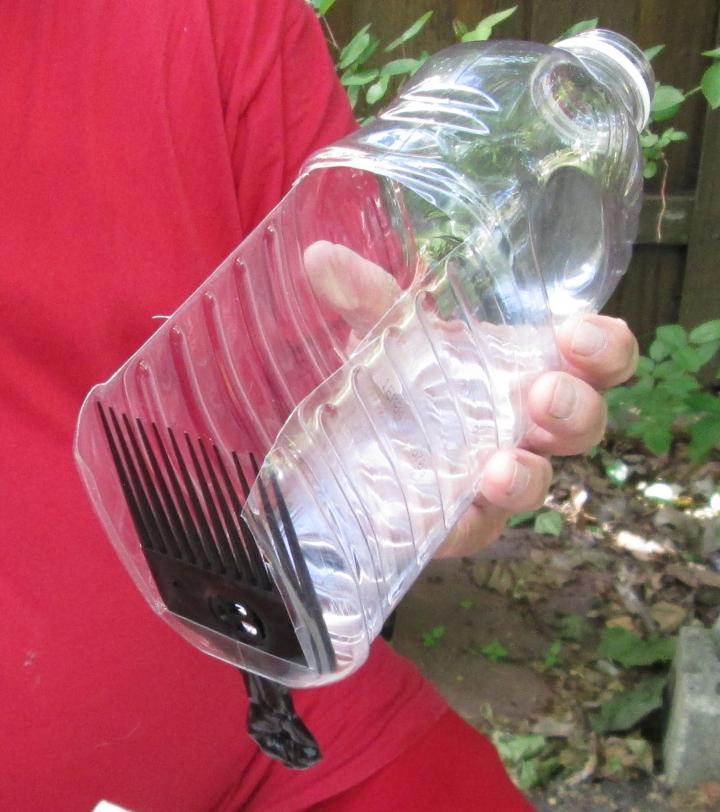
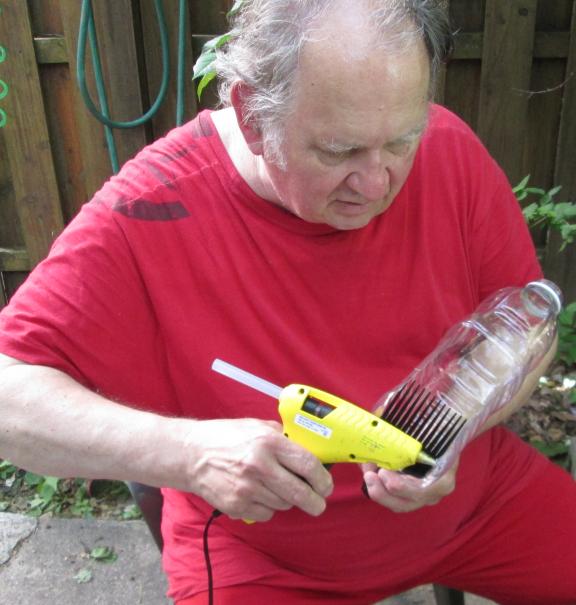
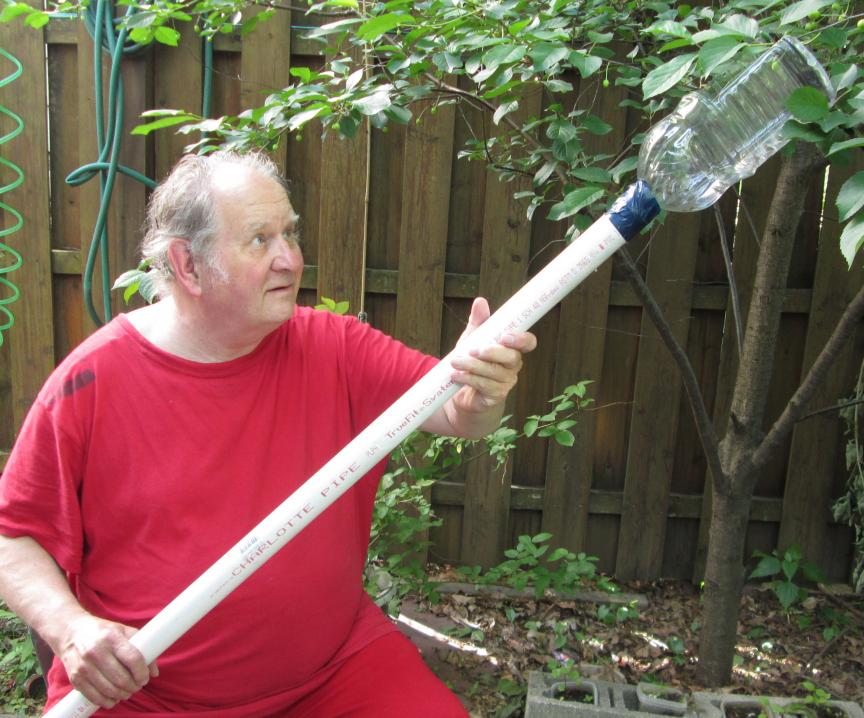
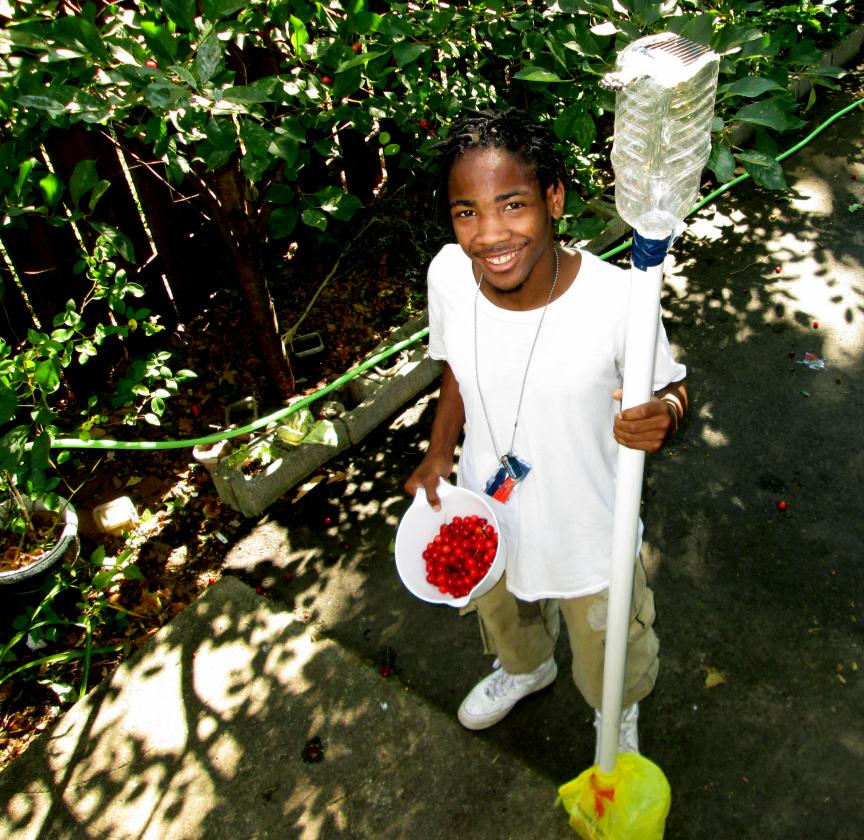
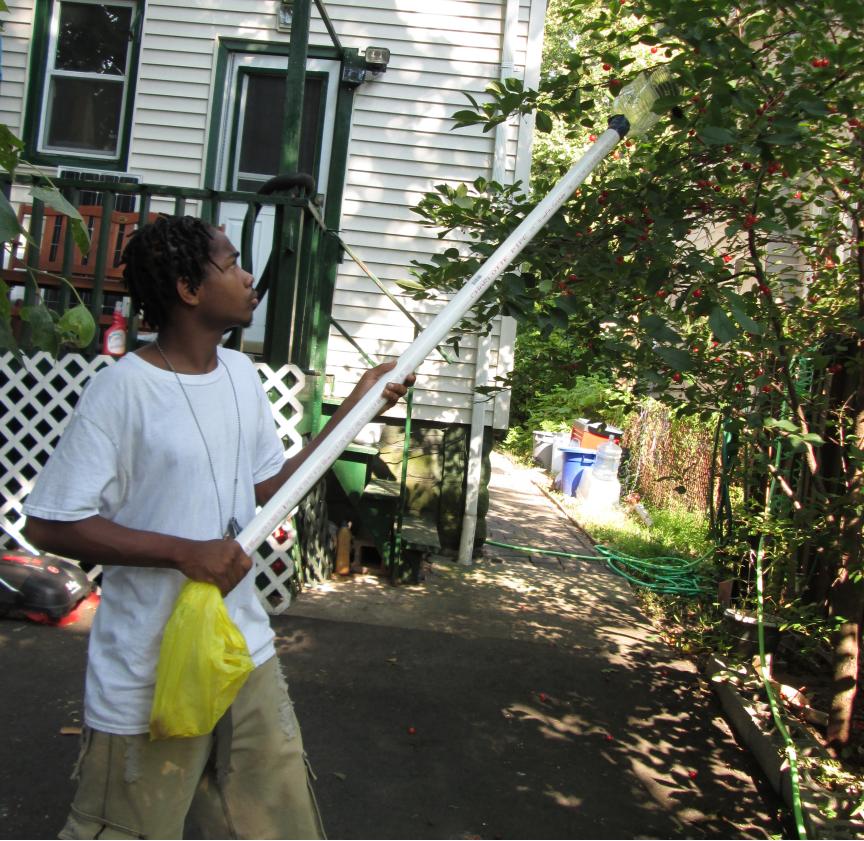

August 24, 2013 - No-Smell Kitchen Compost

Keeping compost in the kitchen can be a smelly process, especially during the warm weather. I have a compositor out in the back yard, but having to trudge out there every day to dump my kitchen compost is no fun in the summer and especially no fun in the winter, or whenever it rains or snows. Here is my No-Smell solution. I got this idea from watching how my cats dispose of their "waste" in my backyard.

For small kitchen compost, like the dregs that get caught in my sink screen, I use two small-size Shop-Rite margarine tubs - the 1 pound size.The brand name isn't important. Just any two plastic containers with air-tight lids will do. In the Spring, or whenever it is on sale, buy some bags of inexpensive potting soil. I got two good size bags at Shop-Rite for $0.99 each this past spring, and those will probably last until next Spring. You can also dig up soil from your own backyard and keep it in a bucket that has an airtight lid. I have a little plastic picnic spoon that I use to dump soil into one of the small plastic tubs. The tub is marked with an "S" for soil, so I know which tub is soil and which is compost (mine is marked with a "C" for compost so I don't forget). Also use the spoon to sprinkle a bottom covering of soil into the Compost tub.

When your sink drain screen fills up, open the Compost Tub and dump the screen onto the soil. Open up the Soil tub and use the spoon to sprinkle enough soil on top to completely cover it up. Make sure you cover it up so you can't see any more of the compost through the soil, and then seal both containers back up. Wipe off the spoon with a used paper towel and you are ready for the next batch. Each time you open the Compost tub you should smell...NOTHING! Or at the most, it should smell like the topsoil in the soil container. When the Compost tub can hold no more, then you can take it outside to the regular compositor to continue transforming into pure topsoil for next year's fertilizer for your garden. If it is snowy or rainy season, have a few more plastic tubs so you procrastinate by filling up a new Compost tub and then take out several at the same time when you are out of empty tubs. The small Soil Tub can be refilled from the topsoil bag whenever needed.

What about larger kitchen compost, like banana peels, corn husks, and other vegetable matter that comes in large quantities? The same system works there as well, but you will need a larger supply of potting soil and a couple of large buckets that have airtight lids. A medium-size tub comes with some ice cream brands at Shop-Rite, or you can get real big buckets with carrying handles and lids at Home Depot. You might want to keep these on your porch rather than in your kitchen, but either way, there is no smell involved once you cover the compost with a layer of topsoil. For the big buckets, you might want a small garden trowel instead of a spoon.

If you don't have a compositor in your backyard or garden, you can still apply the "cat solution." Dig a small hole at one end of your garden, dump the compost tub(s) in and recover it with the soil. Push the shovel into the ground NEXT to the compost hole so you'll have a marker that tells you where your next hole should be dug. Keep digging new holes each time you have compost to bury and by the end of the year, you should be able to go back to the first hole spot and start all over again, with no sigh of the stuff you buried last year- just nice clean top soil that your plants will thrive on. Before the ground gets too hard to dig holes in the winter, dig enough holes to last until Spring and keep a bag of inexpensive topsoil in the house so you can cover your compost during the winter months.


July 14, 2013 - Teakettle Wine. My raspberries are red and ripe for picking, so I will use them to make wine that should be able to be tasted next Christmas. I will be using my own method of making wine in a glass teakettle on my kitchen stove, so click HERE for the directions.


May, 2013 - My latest invention is a "Cherry Picker" tool. My backyard cherry tree has now grown too tall for anyone to safely reach the cherries on the upper branches. Last year I had a couple of Wiz Kids up on a ladder, reaching out with a temporary invention, consisting of a child's sand-play bucket attached to a long handled grass cutter turned upside down so you could clip the cherries and have them (most of the time) fall into the bucket for safe delivery back to the ground. I wasn't too happy watching the kids lean over on the top of that step-ladder, so I put some more thought into the problem and this is what I came up for this year's even taller tree cherries.

From the hardware store I bought a 1 and 1/4 inch diameter PVC pipe. It was 10 feet in length, but I cut it in half to bring it home on the back of my tricycle. The two halves can be put back together ton reach the upper branches of the tree, and if necessary, I can add one or more five foot lengths of PVC pipe to extend it up to 20 feet in the air if necessary. The diameter of the pipe allows a cherry to fall down the inside of the pipe and into a bag that is fastened to the bottom to catch and collect the cherries. At the top end of the PVC pipe is mounted a 64 ounce rectangular cranberry juice bottle with an "Afro" hair pick from the Dollar store glued inside.

I chose a cranberry juice bottle because it has a large opening ( 1 1/4 inches in diameter) to match the PVC pipe. The bottle is cut away around the bottom and along one side. The hair pick is hot-glued inside against the bottom opening of the bottle, around the edges. The points of the pick stick up out of the side opening. To collect cherries, you simply "comb" or "pick" the branches. Let the cherries dangle down into the side opening, which can now be considered the top opening. Pull the whole thing forward, allowing the pick to pluck off the cherries, which drop inside the bottle, and gravity sends them down the PVC pipe into the bag attached at the other end. The pipe is long enough that no step ladder is needed to reach the cherries at the top of the tree. If the tree gets taller, I can always add more pipe sections.

Hair Pick, Juice Bottle, PVC Pipe Hair Pick can pick off cherries. Cut open the side and bottom of the juice bottle.
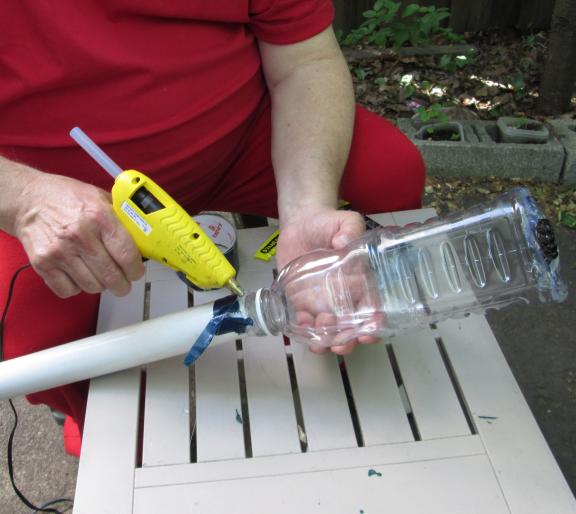
Cut a slot for pick handle to fit on bottom
|of juice bottle.
Hot-glue pick along edges. Hot-glue mouth of bottle to PVC Pipe.
Wrap with Duct Tape.

Reach up into the cherry tree so the cherries fall into the side opening of the bottle. Pull the cherry picker towards yourself to pluck the cherries off the tree. The cherries fall into the bottle and down the PVC pipe where they can be caught in a bag. Cherries that get stuck in the bottle can be dumped into a basket. Cherries that get stuck in the PVC pipe can be unclogged inserting a broom handle or other pipe thinner than the diameter of your PVC pipe. I tried it on a couple of green cherries just to make sure it will work when the cherries are ripe, red and plump for picking.


7/9/13 - July Cherry Picking Time! The cherries are ripe and delicious! So far our favorite recipe is Jim's Cherry Upside-Down Spice Cake, served with vanilla ice cream or yogurt on top instead of frosting. Write for recipe: [email protected]


Indoor Outdoor Security Lights

Security Lights aren't just to scare away would-be burglars. They help us seniors to get around a dark house at night, turning on as we enter a room and turning off by themselves. You can get these battery powered LED security lights from Heartland of America ( www.heartlandamerica.com ) for about $40.00. Most people would use them as outdoor security lights because that is how they are advertised, but they work just fine indoors, with the solar panel hanging outside your house in a sunny spot and the light hanging inside your house above a door in some dark area where you need some light to locate the regular wall switches or to climb up or down a short flight of steps. The 36 LED lights are very bright and they come on only at night when you need them most.

For about $30.00 you can get a Solar LED Shed Light from Heartland of America, which has a pull chain instead of the security light automatic switch. But this light you can turn on and off yourself day or night just by pulling on the chain. Once again, it has a solar panel that stays outside in a sunny spot, while the chain-pulled light hangs indoors where you need the light. The main convenience with these lights is an easily installed (you don't need an electrician) light with no batteries to change...ever.
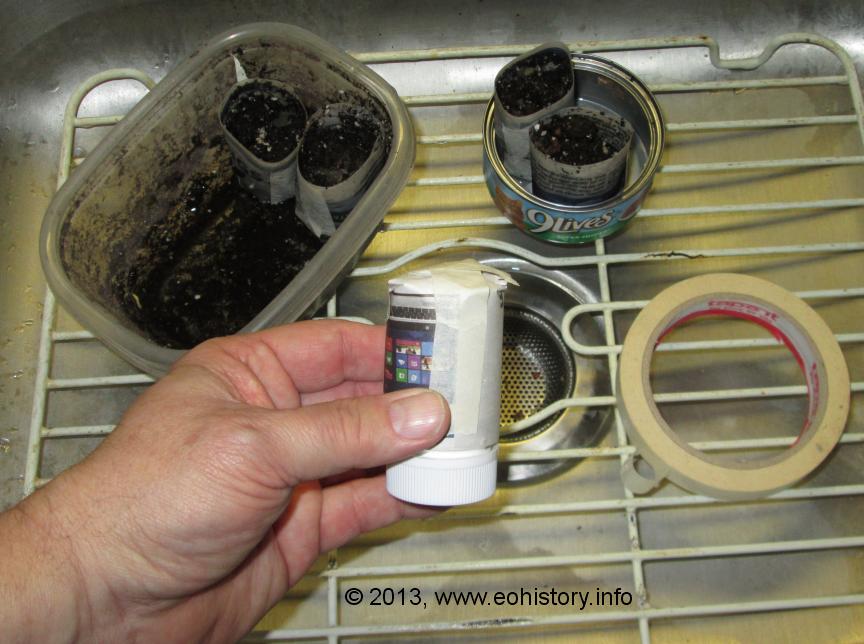
 

Seed Starter Pots

We'll begin with this idea since mid-winter is the best time time to begin planning ahead for spring plantings as soon as all danger of frost has passed.

I use old newspaper advertisement "spam" mail that piles up in my recycling bin. I prefer to recycle it myself, shredding it for mulch, grinding it further and mixing it with garden dirt to make potting soil. In this case, I am using strips of newspaper torn from "Best Buy" sales ads that have expired. I wrap the strip around an aspirin bottle (or anything else about that size) and tape it on the side with cheap Dollar Store masking tape. Then smash down the bottom against the bottle and use two pieces of cheap tape to criss-cross and hold the bottom flat. Slide out the bottle and use the tube as a pot for starting seeds. I can fit two of these pots into a recycled cat-food can, or even more of them into a recycled plastic container that came with something from the grocery store which I can no longer remember eating. These pots are less expensive and work just as well as peat pots from the gardening centers.

When the plants have outgrown the pot, it will probably be time to move them into the garden. You can plant the pot with the plant, or easily tear it free from the roots if you prefer. It's early March and I have already begun to germinate some seeds for my Earth Day "give-away." You can trade a bag of litter picked up off the streets of East Orange for a couple of my garden plants this year on April 22nd.

Back to Interactive Museum Home Page